|
||||||||||||||||||||||||||||||||||||||||||
|
||||||||||||||||||||||||||||||||||||||||||
 3D
Wand Calibration Software 3D
Wand Calibration Software Back to Motion Analysis Software Back to Manufacturers |
The benefits of wand calibration
Many emerging applications require calibration of multiple synchronised
video cameras for a variety of deployments requiring the ability to analyse
motion such as in biomechanics and sport; securing passenger safety
in the automotive industry, for recording high-speed events in a research
laboratory and many others.
From a procedural point of view, camera calibration is a series of steps
that a user performs to find the camera parameters that affect the imaging
process such as focal length, lens distortion, position and orientation.
 Traditionally, calibration was achieved by means of a calibration chart
which proved impractical for many multi-view scenarios. However, modern,
and more efficient calibration is conducted using a wand-based system
that allows rapid, flexible and accurate calibration of multiple cameras
without having to face them in the same direction or of having their fields-of-view
overlap. Using a wand calibration process increases accuracy and ensures
that the results acquired from the analysis are sufficiently accurate
to draw the correct conclusions from
them.
What is the TEMA Wand Calibration Option?
The TEMA software platform provides a range of user-configurable, high-speed
motion analysis solutions for industrial research, design, testing and
safety assessment applications.
Originally developed with the automotive industry in mind, the wand is
ideally suited for crash tests, pedestrian tests and component testing
in 3D, the wand is also perfectly suited for other applications whether
indoors or out of doors. Superseding all traditional 3D preparations (that
is: lens calibration and camera orientation), the wand comes with a simple
procedure, 100% automation and outputs the most accurate and reliable
results available.
| How the TEMA calibration wand works | ||
| 1 | Position the cameras. Set the final zoom, focus and aperture and choose camera positions so that the points of interest on the test object are visible from two or more cameras | |
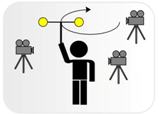
| 2 | Record calibration images from all cameras by moving the wand in the entire measurement volume during approximately 1000 frames and using a low frame rate. | |
| 3 | Set the final frame rate and exposure time without adjusting or moving the cameras. Perform the test and make a synchronised recording from all cameras | |
| 4 | Use TEMA software and the calibration images to calibrate the system. All necessary parameters are calibrated and the process is 100% automatic. | |
| 5 | Use TEMA and the test images to analyse the points of interest. 3D results are computed for each point that is tracked by two or more cameras. | |
The
calibration can be reused in future tests as long as the camera
setup is identical |
||
| Features and benefits | ||
| Quick and easy | Capturing calibration images is easy and processing them is 100% automatic. Results from the calibration are available in few minutes. | |
| Flexible | Supports measurement volumes from 1 x 1 x 1m - 10 x 10 x 3m (W x D x H). Supports multiple cameras | |
| Camera-independent | Cameras of any model, frame rate and resolution can be used together. All image formats are supported. | |
| Powerful | The Wand Calibration computes all camera parameters simultaneously as well as statistics and tolerances for the entire system. | |
| Accurate | Tolerances from 1 - 5 mm can be reached in crash test environments. The actual tolerance depends on the camera setup and is computed as part of the Wand calibration | |
| Materials and design | The carbon fibre construction and the active markers based on LED technology gives a robust, high-quality wand that can be used for many years. | |
| No setup time | No preparation is necessary and there is no need to place reference markers or of doing surveys of the measurement volume in order to calibrate. | |
| Automatic calibration | LED technology combined with a very robust tracking algorithm allows a fast, robust and highly-accurate calibration process | |
What TEMA software
is needed?
** TEMA Automotive module
** 3D option
** Wand calibration option
| Typical
applications |
|
|
** |
Crash tests using
2D, 3D or 6DOF analysis |
| ** |
Airbag analysis: The inflation process is verified
towards simulated modules and the shape, size and position of the
airbag is checked towards boundaries. Analysis is based on contour
and volume measurements. |
** |
Steering column penetration, Rollover tests using
cameras on-board or off-board |
![]() TEMA
Automation product information (2.5 Mb)
TEMA
Automation product information (2.5 Mb)
|
If you like this page, please recommend it and share it. |
|||
| More | |||


