|
||||||||||||||||||||||||||||||||||||||||||
|
||||||||||||||||||||||||||||||||||||||||||

iDS NXT Ocean: A simplified Artificial Intelligence workflow experience
Back
to Newsletter
Go to iDS NXT Ocean Product Page
Go to
iDS Cameras
Go to High-resolution Colour Cameras
Go to High-resolution Monochrome Cameras
Go to GigE Cameras
|
iDS NXT Ocean editorial four of four: How to upload Neural Networks to your iDS camera with the iDS NXT Ocean |
|
|
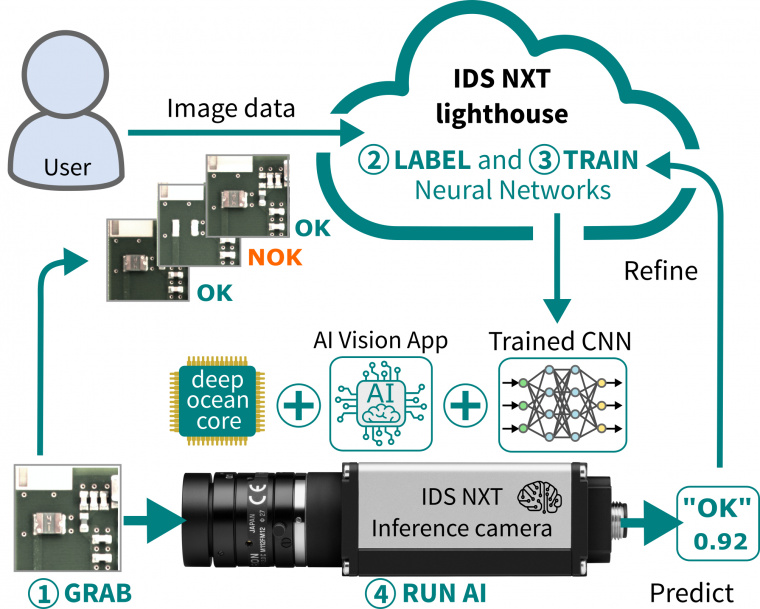
Throughout this four-part series, we have taken you through the
steps to implement your own AI based image processing with the all-in-one
iDS NXT Ocean. The four basic steps to your AI solution are: grab,
label, train and run AI. The
iDS NXT Ocean provides you with everything you need to create your
own AI inference camera. It significantly simplifies the workflow
related to training and running neural networks.
In
part-two, we covered the steps required to upload images to the
iDS NXT Lighthouse web-based AI training service and explained how
to apply labels and annotations to the images for classification
and object detection tasks. Click
here to see our editorial on the "label" element. In part-3, we focused on the training process and how to build neural networks to run successfully on your camera.
Click here to see our editorial on the "training" element.
|
 |
|
In
this, the fourth and final editorial, we will explain how to upload
an inference model to your iDS NXT camera to use for a real-life
application.
The first
step is to open the NXT cockpit application on your local PC,
then by clicking "connect" we select our camera and
log in. Once logged in, you can now navigate to the configuration
tab and click the app manager on the toolbar. As we have already
built both a classification and object detection neural network
in this series of editorials, we can choose either for this last
step: choose either classifier or object detector vision app from
the app manager. Camera settings
are found in the camera tab and the V-app section has some new
controls and functionality. You should now upload the classifier
neural network to the camera. After this, click "install
CNN." The next step is to navigate to the location where
the CNN was downloaded from the web-based application, NXT Lighthouse.
When here, select the file you wish to use and click open. After
a few seconds a message underneath the main image window will
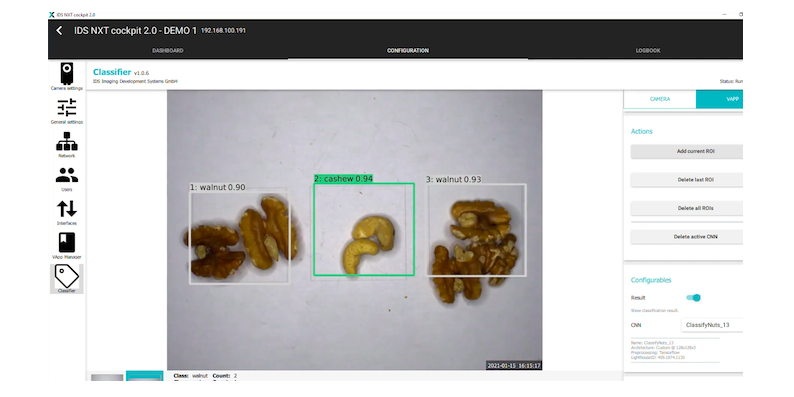
state that the file was succes Click on the CNN tab drop down menu, and under configurables you can select the newly loaded CNN. If the camera is in free run mode (or in triggered mode and receiving triggers) you will see images being captured and the camera immediately starts classifying. The results of each classification will appear underneath the image. Regions of Interest can be used to focus the CNN on a specific part of the image rather than classifying the whole image. This should improve accuracy. The ROI tool can be used to set up an ROI. By clicking add current ROI you can add multiple Regions of Interest. Then
click on the results thumbnail at the bottom of the screen. The
ROI results are revealed along with a confidence score (see image)
on the target objects classification. The results text under the
main image window will also provide a count for each class recognized. Now click the Object Detector icon on the left toolbar to open the object detector page. Under the V-app section now click install CNN, navigate to the CNN file and click "open." Once cockpit reports that the file was successfully uploaded you can select the CNN from the list under configurables and immediately the object detection process begins. By clicking on the ROI thumbnail at the bottom of the screen we can see the object detection results with a bounding box around each object detected along with a confidence score. Under configurables it is possible to set a detection threshold to help filter out any false positive cases, or you could lower the confidence threshold to help identify objects that are difficult to detect. |
|
 sfully
uploaded.
sfully
uploaded. 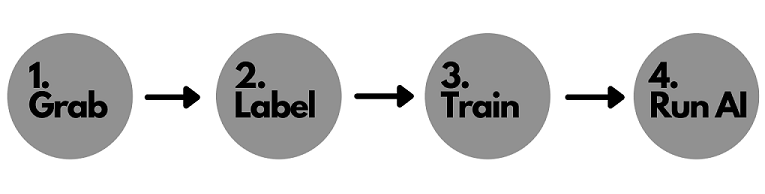
| What the iDS NXT Ocean kit includes | |
|
iDS
Rio camera with |
iDS NXT Rio is a fully-fledged standard industrial camera that can execute neural networks with hardware acceleration giving inference times of a few milliseconds thanks to the integrated, specially developed AI core ("deep ocean core"). Thanks to features such as C-Mount, GigE network connection with RJ45 connector, a serial RS232 interface and REST web interface, this model is ideally suited for use in industrial environments. With the Sony global shutter CMOS sensor the camera is suitable for customers with high demands on image quality, dynamic range and sensitivity. It provides a resolution of 1.6 MP at 3.45 µm pixel size. The iDS NXT Rio GS29016 is available in monochrome or colour. |
|
6
Month license for
|
|
|
The
iDS NXT Lighthouse cloud software allows those without expertise
in the area of artificial intelligence or camera programming to
train an AI classifier with their own image data. As a web application,
the necessary means to create the neural network are immediately
available, meaning you wont have to initially set up your own development
environment.
Subsequently you can start on your own neural network straight away. Image processing can take place entirely or partially on the camera FPGA, this reduces bandwidth and computing load. |
|
| The iDS NXT Ocean kit also includes: | |||
|
High quality lens
|
Gigabit Ethernet Cable
|
Camera power supply with necessary adapters
|
Camera tripod adapter
|
|
Specifications
|
iDS
NXT Rio GS29016
|
||
|
Sensor
Type
|
CMOS
Colour
|
||
|
Shutter
|
Global
Shutter
|
||
|
Sensor
characteristic
|
Linear
|
||
|
Resolution
|
1456
x 1088 Pixel
|
||
|
Pixel
Size
|
3.45
x 3.45 um
|
||
| Need
a price or more application information? Please
email Adept Turnkey or call our offices Adept Turnkey Pty Ltd is "The Machine Vision and Imaging Specialists" and distributor of iDS products in Australia and New Zealand. To find out more about any iDS product, please call Adept Turnkey at Perth (08) 9242 5411 / Sydney (02) 9905 5551 / Melbourne (03) 9384 1775 or contact us online. |
|||


|
If you like this page, please recommend and share it. |
||
| More | ||